Mastering React.js: Crafting Dynamic and Responsive Front-End Experiences
An guide on how to structure you projects, in order to scale easily
Gerald Kamau

React is among the top 10 frameworks in 2023. Almost every company including Apple, Github, Airbnb, Discord, Netflix, and Pinterest among others are using React for better web experiences.
In this blog we’ll explore some of the fundamentals in using React on creating real world applications. By the end of this post you will have a more solid understanding of how to write your web applications in React and why it has become so popular.
Architecture
- Root
This is among the most crucial parts of writing any React applications. I want to start off by saying there is no "good" way to architecture your project, but there some very good architecture practices you can follow.

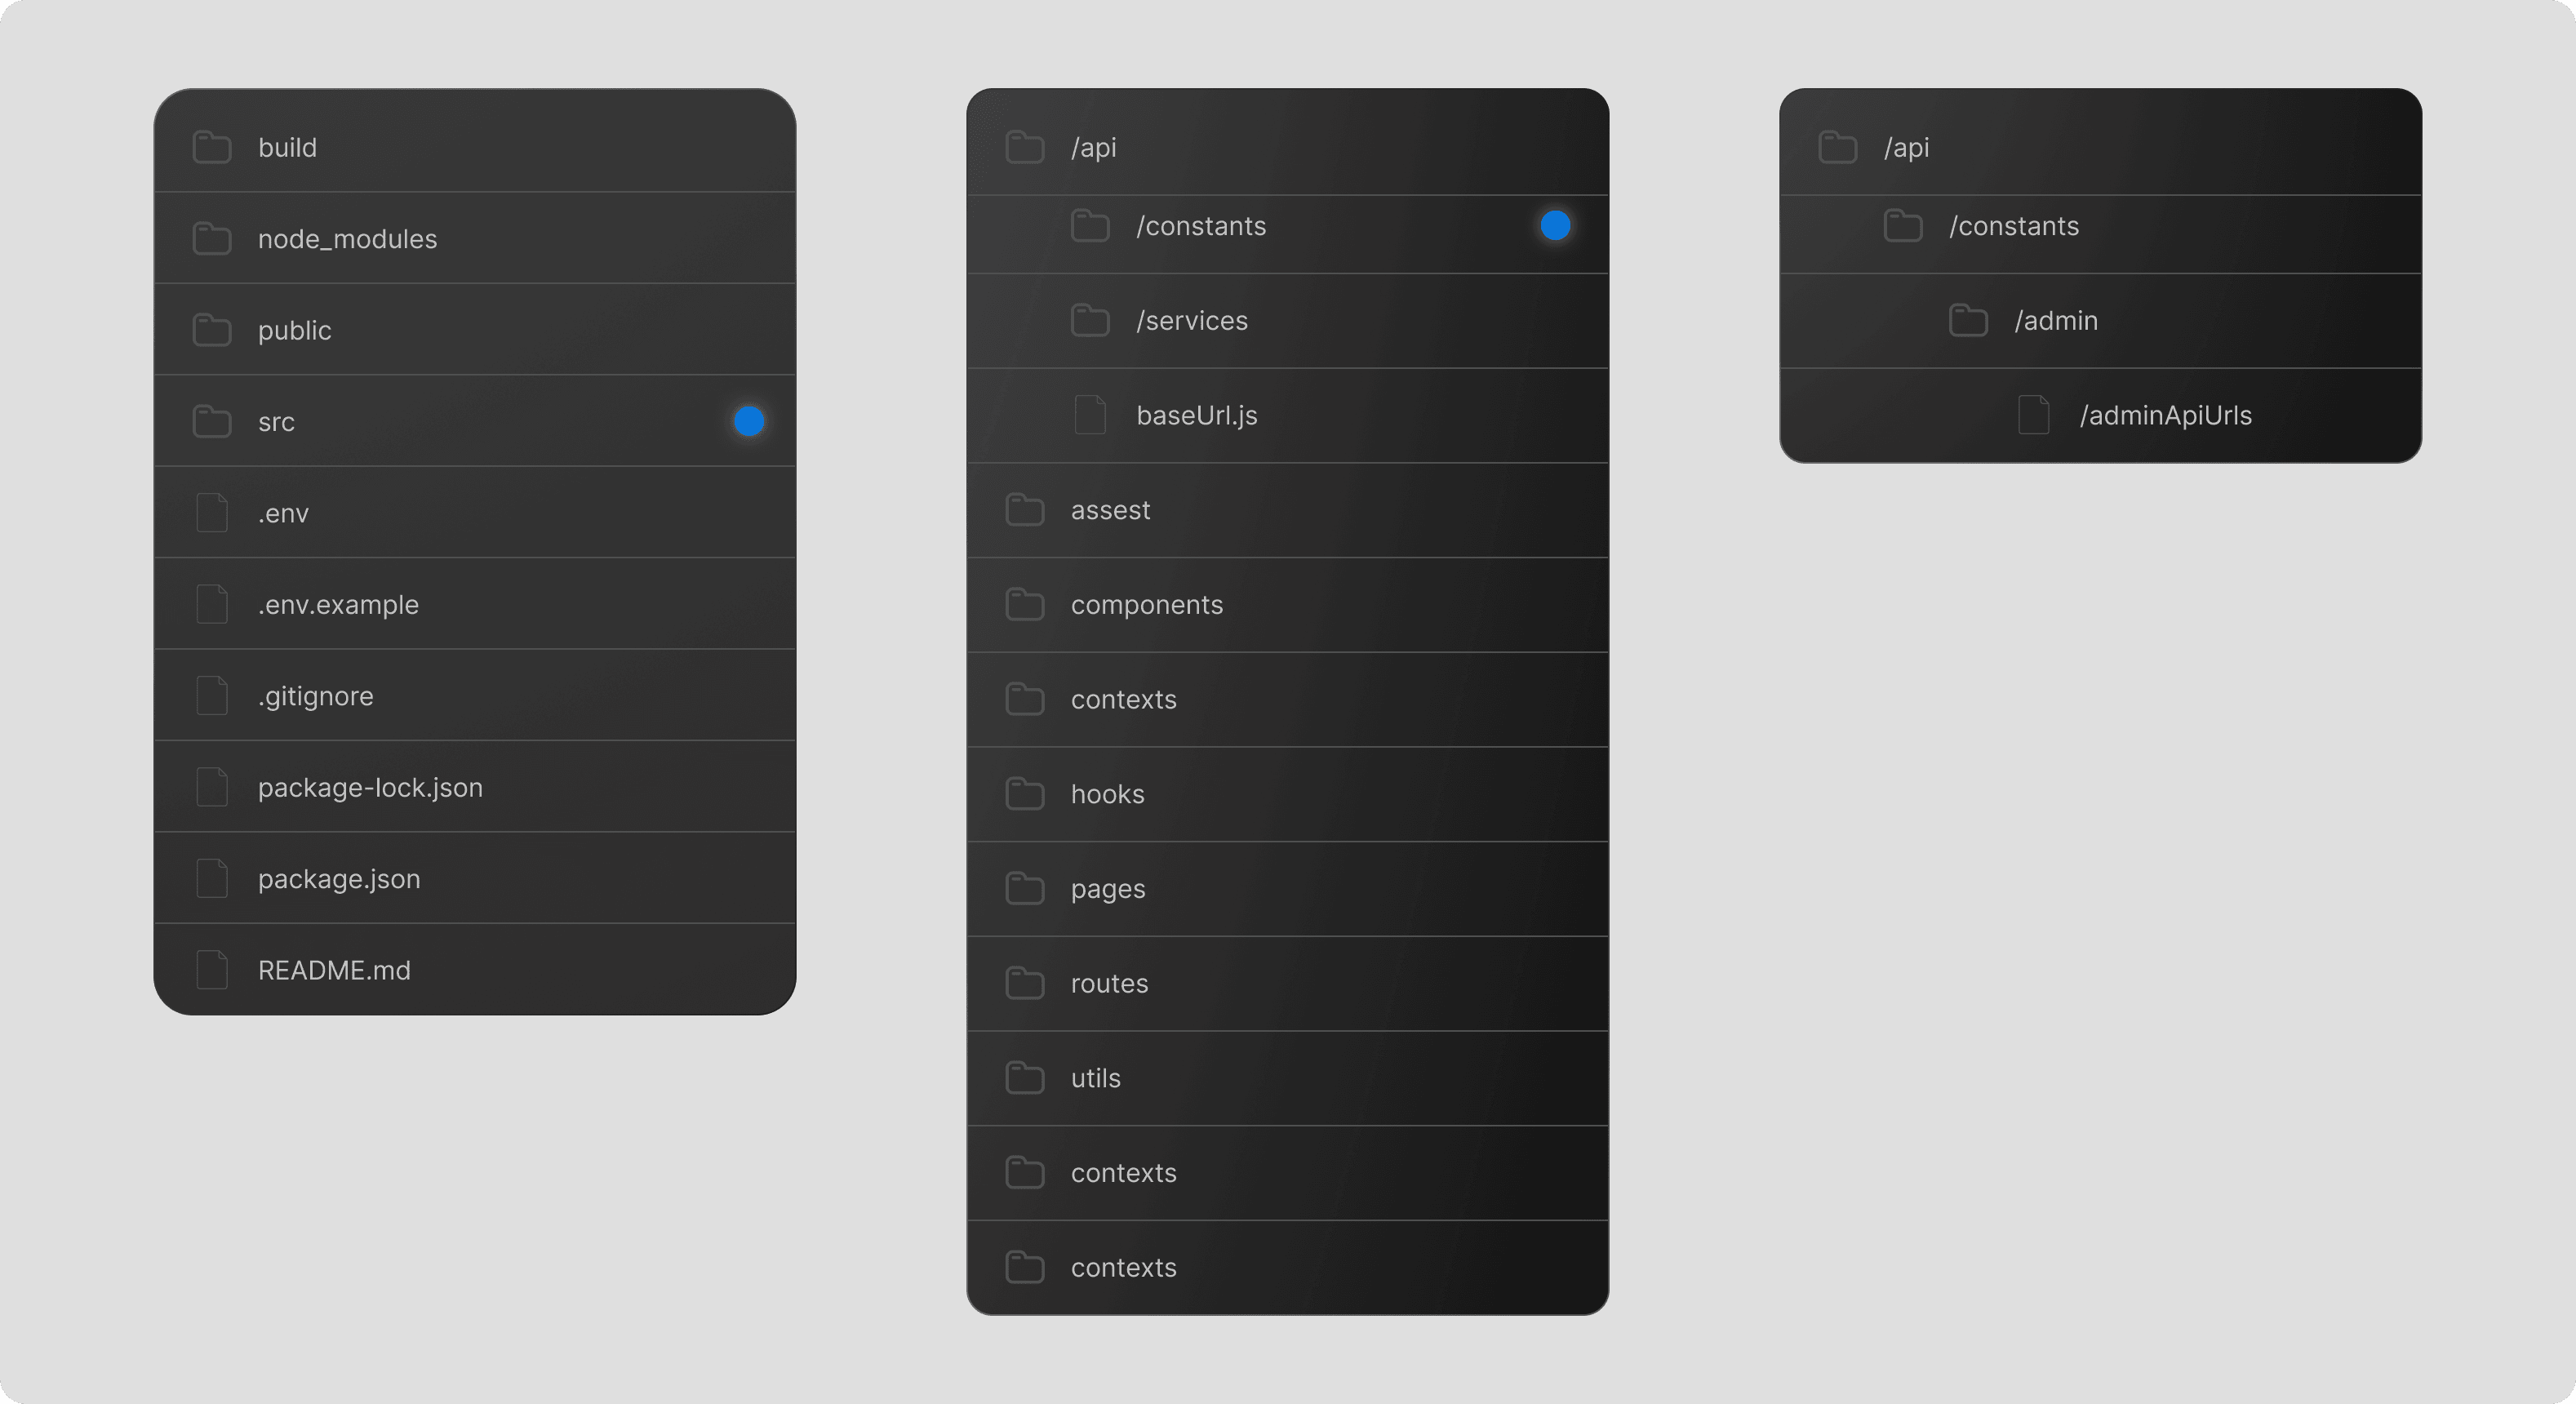
The illustration above shows how you can organize your files and folders in your project. These are essentially the root folders and files of your project. The build directory is generated by the command npm run build.
- Nesting
Having a good architecture enables you to easily scale your application and have things in a clean way. You can also see from the illustration how the leaf directories look like. The naming convention of your files and folders ultimately depends on you.

Good coding practices
Modular Components:
This means that you have break down each component to only handle one task at a time. Break the UI down into small reusable components.
import UserData from "./UserData";

const UserProfile = ({ props }) => {
  return (
    <div className="flex flex-col items-center justify-center">
      {props.map((prop, i) => (
        <UserData key={i} data={prop} />
      ))}
    </div>
  );
};

export default UserProfile;
Instead of mapping through the users data and rendering it on the users profile. You can make the user data a different component and this now means the UserData component can be reusable in other parts of your code, while also ensuring modularization.
State Management
This can be one of the most challenging bits as your application grows. Managing state can be very messy. Let's look at some ways to solve the mess
- Lifting State
Lifting state is the practice of managing state in a common ancestor component and passing it down to its descendants as props. This enables communication between components that might not have a direct parent-child relationship. Let's explore this concept through a simple example.
import React, { useState } from "react";

/** Counter component */
const Counter = ({ count, onIncrement }) => {
  return (
    <div>
      <p>Counter: {count}</p>
      <button onClick={onIncrement}>Increment</button>
    </div>
  );
};

/**Display count component*/
const Display = ({ count }) => {
  return <p>Display: {count}</p>;
};

/**App component (parent) */
const App = () => {
  //State holding the count value
  const [count, setCount] = useState(0);

  // Handler for incrementing count
  const handleIncrement = () => {
    setCount(count + 1);
  };

  return (
    <div>
      {/* Counter component with count and onIncrement prop */}
      <Counter count={count} onIncrement={handleIncrement} />

      {/* Display component with count prop */}
      <Display count={count} />
    </div>
  );
};

export default App;
-
Using state management libraries
One of my personal favorite is redux-toolkit. It gives me full control over my intended actions and i can easily set it up. There are many other state management libraries one can use. It all depends with various factors such as
- The needs of your application
- Company policies or preference
- Developer preference
import { createSlice, createAsyncThunk } from "@reduxjs/toolkit";
import { sendMobileMoneyService } from "../where your service is located;

//It does not matter where you instantiate the initial state
const initialState = {
  amount: "",
  phoneNumber: "",
  loading: false,
  error: null,
};

export const sendMoney = createAsyncThunk(
  "send-money",
  async ({ data }, { rejectWithValue }) => {
    try {
      const response = await sendMobileMoneyService(data);
      if (response) {
        return response.data;
      } else {
        return response.data.message;
      }
    } catch (error) {
      return rejectWithValue(error.message);
    }
  }
);

const sendMoneySlice = createSlice({
  name: "sendMoney",
  initialState,
  reducers: {
    setPhoneNumber: (state, action) => {
      state.phoneNumber = action.payload;
    },

    setAmount: (state, action) => {
      state.amount = action.payload;
    },
  },
  extraReducers: (builder) => {
    builder
      .addCase(sendMoney.pending, (state) => {
        state.loading = true;
        state.error = null;
      })
      .addCase(sendMoney.fulfilled, (state, action) => {
        state.loading = false;
        state.error = false;
        state.action = action.payload;
      })
      .addCase(sendMoney.rejected, (state, action) => {
        state.loading = false;
        state.error = action.payload;
      });
  },
});

export const {setPhoneNumber,setAmount} = sendMoneySlice.actions;

export default sendMoneySlice.reducer;
- Context api
This is a built in react state management solution. In the illustration at the top of the page you can see the folder named context. That can be also responsible for managing state. One thing to have at the back of your mind is to always wrap your app in the context of choice in order to access the data anywhere in you application.
Lets see an example/**This is the context file named MyContext*/
import React from "react";
const MyContext = React.createContext();
const MyProvider = ({ children }) => {
const sharedData = "Hello from Context!";
return <MyContext.Provider value={sharedData}>{children}</MyContext.Provider>;
};
export default MyProvider;
/** This is the jsx component that will now have access to the sharedData value */
import React, { useContext } from "react";
const SharedData = () => {
const sharedData = useContext(MyContext);
return (
<div>
<h1>{sharedData}</h1>
</div>
);
};
export default SharedData;
/** Wrap your app in the context*/
import React from "react";
const App = () => {
return (
<MyProvider>
<MyComponent />
</MyProvider>
);
};
Dry-coding
Dry coding is a common practice among software developers in any tech stack. Its a good practice to avoid redundancy. Check more on the same
Conclusion
The more you code, the more you'll grasp the intricacies of this library and uncover its vast potential. Keep exploring, keep coding, and let React be your companion in crafting extraordinary front-end experiences.